Gamepad Phoenix
A downloadable tool for Windows
If you plan to donate via PayPal, PLEASE consider doing it directly to me via this link to avoid Itch taking away 50%. Thank you.
Gamepad Phoenix is a tool for Windows to play any game (old or new) with any gamepad (old or new).
Features
InstallationDownload the package with the button at the top of this page and extract the ZIP file. Then run GamepadPhoenix.exe to launch the tool. DonationsTips and donations are welcome, either through here on itch.io or the Sponsor button at the top of the GitHub project. Thanks for your consideration! | 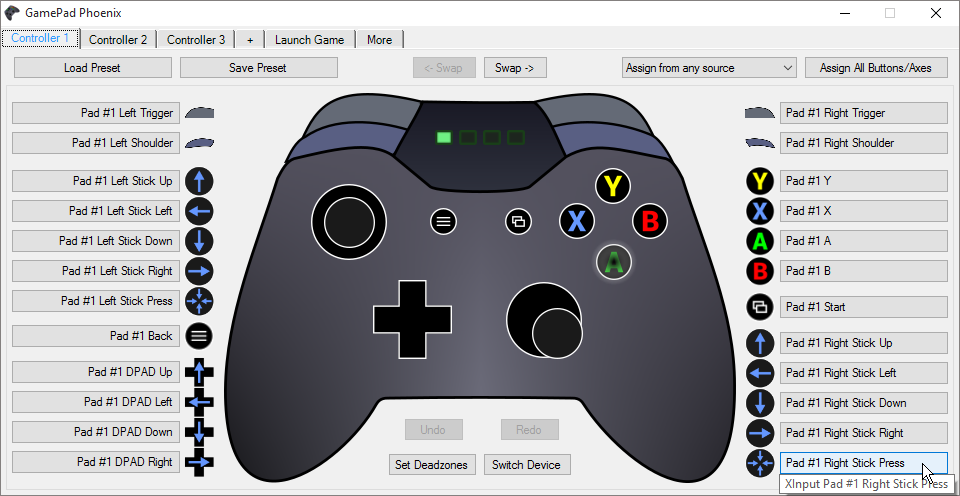 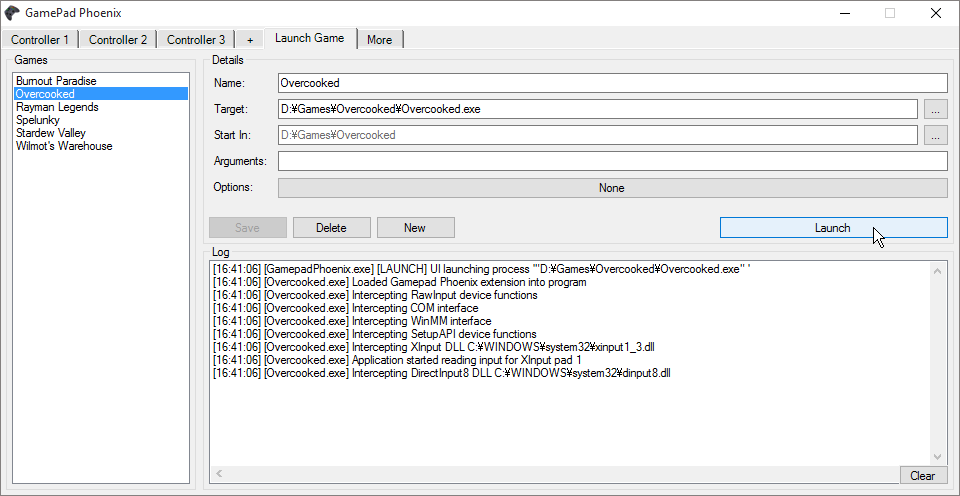 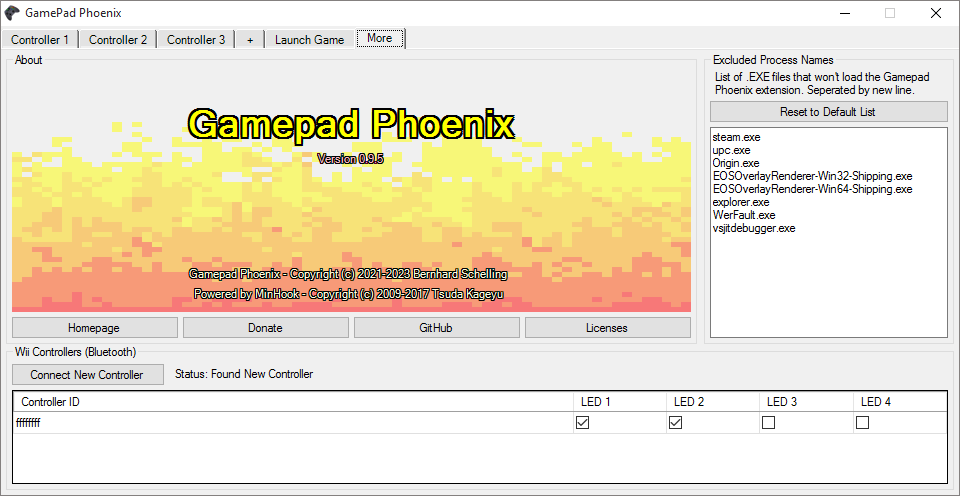 |
Usage
Map Controllers
To map an entire emulated controller, just click the "Assign All Buttons/Axes" button in the top-right of the window and press the buttons and stick directions in order as prompted. If a button or axis is not available on the real controller, you can click the "Clear" button to skip assignment.
Individual parts of the gamepad can be remapped by clicking them either on the graphic in the center or by clicking a specific part in the lists on the sides of the window.
- To avoid input from a XInput gamepad getting misrecognized, you can set the drop-down selection to "Assign only from XInput".
- To clear all mappings of a controller, right click the controller tab and select "Clear All Assignments".
- To add another emulated gamepad, click on the '+' tab between the last controller tab and the "Launch Game" tab.
- Up to 4 emulated controllers can be defined.
Manage Presets
You can load and save controller mapping presets using the two buttons in the top-left of the window.
While loading a preset, if you press L1 on a controller and a matching preset exists, it will be loaded automatically.
Setup Games
On the "Launch Game" tab, press "New" to create a new game launch configuration.
Next, click "Select Game EXE" to browse for the executable of the game to launch through Gamepad Phoenix.
Selecting the game .EXE will automatically fill out the fields 'Name', 'Target' and 'Start In'.
You can modify them afterwards as needed and define optional launch command line arguments as well.
Don't forget to click the "Save" button to store it in the games list.
The games list can be re-ordered by dragging items with the mouse.
Launch Game Options
The following per-game options can be toggled by clicking on the Options box in the game details.
- Map D-Pad to Left Stick
Will make the D-Pad on all emulated controllers also control the left analog stick. - Swap A and B Buttons
Switch the A and B button on all emulated controllers. - Swap L1/R1 and L2/R2
Switch the upper shoulder/bumper buttons with the lower triggers. - DirectInput: Map Triggers to Buttons instead of Analog Axis
Modifies the analog triggers to be regular digital buttons (required for some older games) - DirectInput: Map D-Pad to Buttons instead of Point of View Hat
Modifies the D-Pad to be 4 separate digital instead of a POV hat (required for some older games) - Use Indirect Loading (Prepare redirector DLL to allow external stores/launchers)
See section on indirect loading below. - Disable XInput (return no connected controllers)
When set, the game will find no connected XInput controllers and will have to use other interfaces (most commonly DirectInput) to access the gamepads. - Disable DirectInput (return no joystick or only fake XInput gamepads)
When set, Gamepad Phoenix will not return DirectInput specific gamepads (with separate axis for the two triggers) but instead return only controllers when XInput is also used. - Disable MMSys (return no joystick or only fake XInput gamepads)
When set, Gamepad Phoenix will not return MMSys specific gamepads (with separate axis for the two triggers) but instead return only controllers when XInput is also used. - Force game window to borderless fullscreen
Will resize the game window to fill the entire screen. Useful for games that don't support this natively.
Indirect Loading
The game option 'Use Indirect Loading' can be required for some games that refuse to run directly by launching the .EXE file.
Things like launchers, updaters or game stores can make the direct loading method not work.
Check the log view below the game details for how a game behaves when launched and try this option when the gamepad emulation does not work.
When enabled, two additional buttons "Prepare" and "Restore" will appear next to the "Launch" button.
Use the "Prepare" button to analyze the game and set up an appropriate redirector DLL automatically.
After preparing, the game can be launched through the tool or directly through its launcher or store.
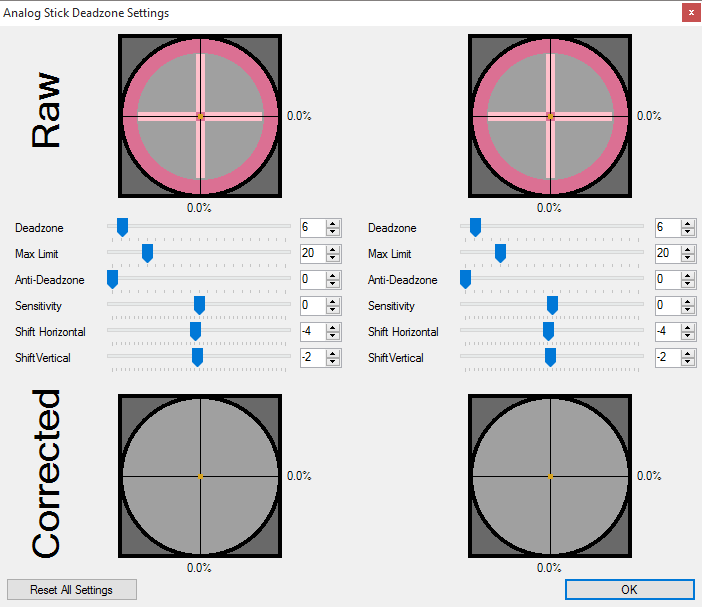
Deadzone Settings
|
The left and right analog sticks of each emulated gamepad can be tweaked by clicking the "Set Deadzones" button below the gamepad image. The settings window will show both raw inputs coming in and corrected stick movement to be sent to the game. For each analog stick there are 6 settings available:
|  |
Connect Wii Controllers
Gamepad Phoenix supports communication with Bluetooth powered Wii Remote Controllers and using them just like regular Windows controllers.
Buttons and axes from the main controller and extensions can be mapped. Motion controls are not supported. Supported extensions are Classic Controller (including Pro and NES/SNES Classic Mini variants), Nunchuk and the WiiU Pro Controller.
To connect to a controller, make sure the PC has a Bluetooth module installed (can be either built-in or a USB dongle). Then switch to the "More" tab in Gamepad Phoenix and click the "Connect New Controller" in the "Wii Controllers" section.
Next, press the red SYNC button behind the battery cover of the Wii Remote Controller. After a few seconds, the status info text should switch from "Searching For Wii Controller" to "Registering HID Service" and finally to "Found New Controller".
Once the controller has been connected, the LEDs pattern can be set with the four checkboxes in the Wii Controller list. The buttons and axes can be mapped to any of the gamepads in the "Controller" tabs like a regular controller. Make sure to check the deadzone settings to confirm or adjust calibration issues and offsets.
The controller will not be paired to the PC and needs to be connected again once it loses power or the sync button gets pressed.
Mouse/Keyboard Inputs
Besides physical gamepads, mouse and keyboard inputs can also be freely mapped to each emulated gamepad button and axis. To bind mouse movement strongly move the mouse into a direction while reading inputs. To bind a mouse button hold it for a short duration. To avoid mouse or keyboard inputs getting assigned switch "Assign from any source" to "Assign only from Gamepads".
When using mouse movement as an analog stick, use deadzone settings to customize the amount of movement needed to control the stick. It is suggested to use a high setting for "Max Limit" and a low setting for "Sensitivity" to reduce the movement required to reach maximum stick tilt. For mouse inputs the "Sensitivity" deadzone setting controls how slow/fast the stick centers itself back when stopping mouse movement.
Command Line Option
To directly launch a configured game you can pass the game name to the program:
GamepadPhoenix.exe "My Game"
This will start Gamepad Phoenix in minimized state and launch the game configured with the name "My Game".
Gamepad Controls
The tool itself can be navigated with the mapped controllers.
- While holding select/back, L and R switch tabs
- While holding select/back, A/B/X/Y jump to the "Launch Game" tab
- While holding select/back, Left/Right swaps the gamepad order
- On the "Launch Game" tab, Up/Down selects the previous/next game
- On the "Launch Game" tab, Left/Right scrolls the game list by 10
- On the "Launch Game" tab, Start/A/B/X/Y launches the selected game
Missing Features
These features are not yet implemented but hopefully will be some day.
- Force feedback support
- Emulate more controllers/buttons/axes
- Support for more Bluetooth controllers (PS3 and PS4 come to mind)
- Emulate Windows Raw Input API
If you plan to donate via PayPal, PLEASE consider doing it
directly to me via this link to avoid Itch taking away 50%. Thank you.
Download
Click download now to get access to the following files:
Development log